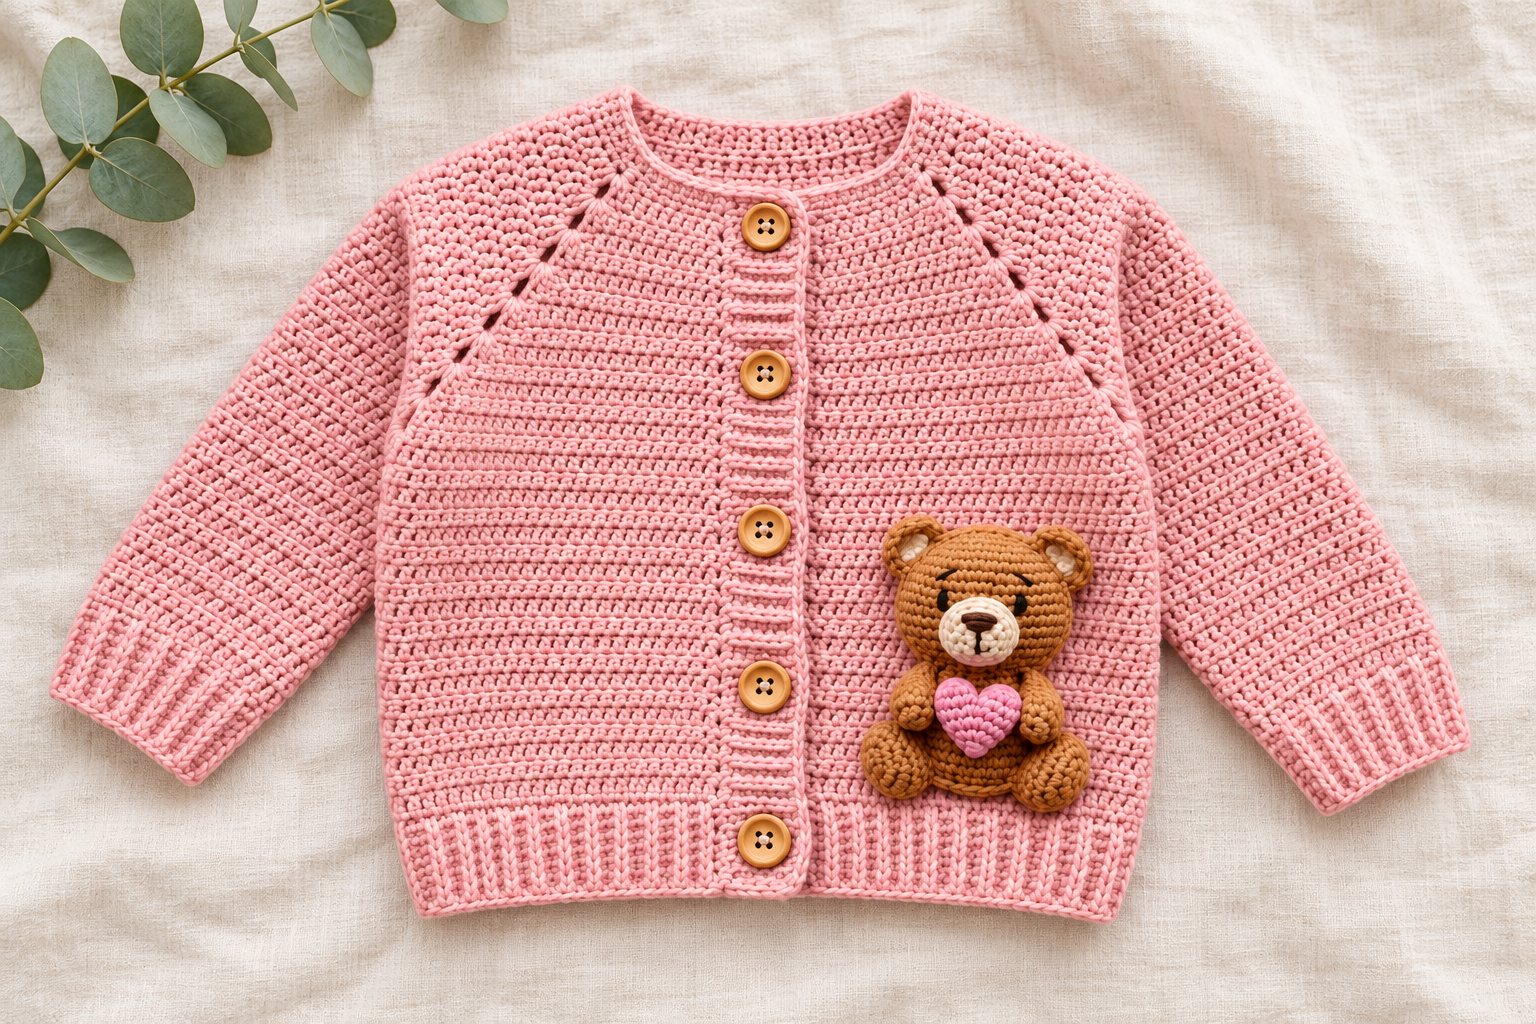
Blush Pink Teddy Bear Baby Sweater Crochet Pattern
A soft pink cardigan, warm wooden buttons, and a tiny bear holding a heart make a sweet combination for a handmade baby gift. This version pairs a simple half double crochet fabric with narrow ribbed edges and a caramel-colored teddy stitched onto one front panel. The open front makes dressing easier, while the small heart adds a cheerful detail without introducing another large color block.
The cardigan begins at the neckline. You work back and forth through the yoke, leave openings for the sleeves, and continue down the body. Each sleeve is added afterward. The teddy is made separately in small single crochet pieces, assembled, and sewn to the finished cardigan.
This guide uses US crochet terminology and gives one size: 3–6 months. Choose by the finished measurements rather than age alone. Babies of the same age can need different amounts of room through the chest and sleeves.
Pattern status: This is an expanded, technically revised adaptation with the original finished-size targets. Stitch arithmetic has been checked, but the revised garment has not been physically crocheted or fit-tested. Follow the measurement checkpoints, and make a sample before treating the pattern as a tested design. The photographs are AI-generated styling illustrations inspired by the supplied thumbnail; they are not photographs of a sample made from these instructions.
Project overview
Plan this as an intermediate project. The stitches themselves are familiar, but you will need to track four yoke boundaries, count decreases, fit a ribbing strip to an edge, and sew several small teddy pieces neatly.
Allow approximately 15–23 hours: roughly 12–18 hours for the cardigan and another 3–5 hours for the bear and finishing. These are planning estimates, not a fixed making time. Swatching, working slowly, or revising the fit can extend the project.
The main cardigan has no separate shoulder or side seams. The ribbing and teddy do require sewing. Before beginning, read through the yoke and sleeve sections so you understand where the construction changes from flat rows to joined rounds.
Finished size and measurements
| Measurement | Target |
|---|---|
| Intended size | 3–6 months |
| Chest circumference, with front closed | 17 inches / 43 cm |
| Chest width laid flat, with front closed | 8.5 inches / 21.5 cm |
| Shoulder to lower edge of hem | 9.5 inches / 24 cm |
| Underarm to lower edge of cuff | 6 inches / 15 cm |
| Sleeve circumference at its widest point | 7 inches / 18 cm |
The inch and centimeter figures are rounded equivalents. Choose one measuring system and use it throughout. These are finished garment dimensions, not the baby’s body measurements. Compare them with a cardigan that already fits, and leave enough room for comfortable movement and the layer worn underneath.
Measure the chest with the two front bands overlapping as they will when buttoned. Measure sleeve length along the underside, from the underarm join to the finished cuff edge. Keep the fabric relaxed rather than pulling it taut.
Yarn, hooks, and supplies
Use smooth DK yarn, weight category 3, for the cardigan. A yarn with clear stitch definition makes the raglan boundaries and ribbing easier to see. Choose a soft fiber suitable for the intended wearer and follow its care label. If you substitute yarn, compare the washed swatch as well as the label’s weight category.
- Color A — blush pink: approximately 250–300 yards / 229–274 m for the cardigan. This is the source quantity; the revised sleeve width and your swatching may require additional yarn, so keep extra from the same dye lot available.
- Color B — caramel or tan: approximately 30 yards / 27 m for the teddy.
- Color C — pink: approximately 5 yards / 4.5 m for the heart. Use the cardigan pink or a slightly deeper shade if you want the heart to stand out.
- Color D — cream or off-white: a small amount for the muzzle.
- Dark brown yarn or embroidery thread: a small amount for the nose, mouth, and embroidered eyes.
- 4.0 mm hook: starting size for the cardigan; adjust to achieve gauge.
- 3.5 mm hook: starting size for the teddy and ribbing; adjust ribbing separately if its measured width needs changing.
- Five wooden buttons, approximately 15 mm across, suitable for the yarn’s care requirements.
- At least eight stitch markers, a yarn needle, scissors, measuring tape, and a small amount of polyester fiberfill.
Use embroidered eyes for this baby version. Plastic safety eyes can become loose small parts, and their name does not make them appropriate for an infant garment. Sew the buttons and teddy firmly, conceal the yarn ends, and inspect the attachments before each wear. Small objects can pose choking risks to young children; see the CPSC’s small-parts guidance.
Gauge: check both width and height
The reference gauge is 16 hdc × 12 rows = 4 × 4 inches / 10 × 10 cm, worked flat with the 4.0 mm hook and measured after washing or blocking as appropriate for the yarn.
Make a swatch larger than the measuring area. Chain 26, work hdc from the third chain onward, and continue for enough rows to leave an undistorted central square. Wash or block the swatch, let it dry completely, and count the stitches and rows within the center.
If you count more than 16 stitches across 4 inches, your stitches are too small; try a larger hook. If you count fewer, try a smaller hook. Check row gauge again after changing hooks. Matching stitch gauge does not automatically mean that the length will match.
At the stated gauge, 65 body stitches span about 16.25 inches before the front bands are considered. The bands supply the remaining front coverage, with their overlap deducted when the cardigan is closed. Their final width must therefore be checked against the 17-inch chest target. The yoke’s row count also produces a deeper yoke than a 3-inch checkpoint would suggest, so this adaptation uses the overall shoulder-to-hem measurement to determine body length.
Abbreviations and stitch methods
These are US terms. The Craft Yarn Council abbreviation list is a useful reference when checking terminology.
| Term | Meaning |
|---|---|
| ch | Chain |
| sc | Single crochet |
| hdc | Half double crochet |
| dc | Double crochet |
| sl st | Slip stitch |
| inc | Work 2 sc into the same stitch, in the teddy instructions |
| hdc2tog | Half double crochet two stitches together |
| sc2tog | Single crochet two stitches together |
| BLO | Back loop only |
| RS / WS | Right side / wrong side |
| st / sts | Stitch / stitches |
| sk | Skip |
| sp | Space |
Half double crochet: Yarn over, insert the hook into the indicated stitch, yarn over and draw up a loop. Yarn over again and draw through all three loops on the hook.
Half double crochet decrease: Yarn over, insert into the next stitch, and draw up a loop. Yarn over, insert into the following stitch, and draw up another loop. Yarn over and draw through all five loops. Two stitches have become one.
Single crochet decrease: Insert into the next stitch and draw up a loop; insert into the following stitch and draw up another loop. Yarn over and draw through all three loops. For a tidier teddy surface, you may use an invisible single crochet decrease through the two front loops instead, keeping the same counts.
Double crochet: Yarn over, insert into the indicated stitch or ring, and draw up a loop. Yarn over and pull through two loops, then yarn over and pull through the remaining two loops.
Magic ring: Make an adjustable yarn loop, draw a working loop through it, and ch 1. Work the required stitches around the ring and its tail. Pull the tail to close the center, then secure that tail when finishing the piece.
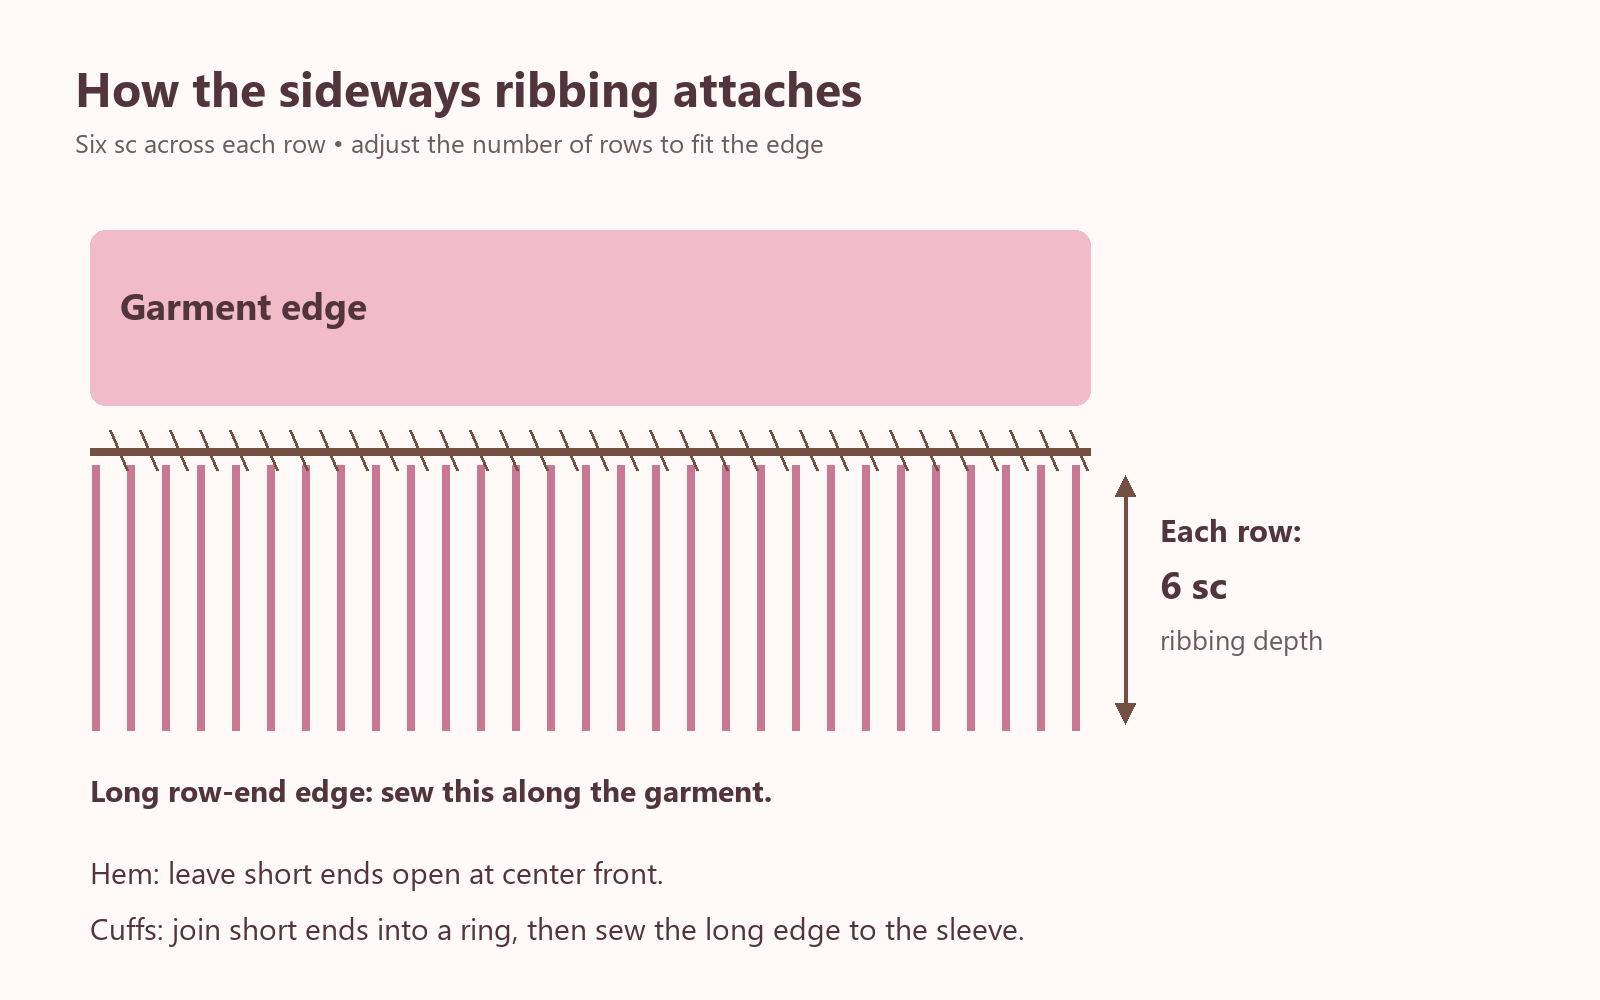
BLO ribbing: Work each sc into the back loop of the stitch below. Turning the narrow strip after every row creates the ribbed texture. The strip’s row-end edge is sewn along the garment edge; its two short ends define the depth of the hem or cuff.
Read these construction notes first
- The ch 2 at the start of a cardigan row or sleeve round does not count as a stitch. Work the first hdc into the first actual stitch.
- The ch 1 used for sc rows also does not count as a stitch.
- Four markers sit between sections, not in counted stitches. A chain space at a raglan boundary is decorative and is not included in the hdc total.
- On plain yoke rows, skip the decorative chain spaces. Keep the markers between the same neighboring sections after turning.
- Sleeve rounds are joined with a sl st to the first hdc. Do not count the joining slip stitch or work into it on the next round.
- The teddy pieces use continuous rounds unless stated otherwise. Move a marker to the first stitch of every round.
- Right and left front refer to the wearer’s sides. Pin the teddy and closures in place before sewing so the placement matches your chosen viewing orientation.
Part 1: crochet the raglan yoke
Establish the neckline
With Color A and the 4.0 mm hook, ch 47.
Row 1 — RS: Hdc into the third chain from the hook, then hdc into every remaining chain. 45 hdc.
Divide those stitches into five sections in the order you worked them:
- Front: 6 stitches; place a boundary marker after stitch 6.
- Sleeve: 6 stitches; place a boundary marker after stitch 12.
- Back: 21 stitches; place a boundary marker after stitch 33.
- Sleeve: 6 stitches; place a boundary marker after stitch 39.
- Front: the remaining 6 stitches.
Row 2 — WS: Ch 2, turn, and hdc into every stitch. 45 hdc. Reposition the markers at the same section boundaries. Because you turned, the order of the sections is reversed on this pass.
Work an increase at a section boundary
On an increase row, work across the current section until its final stitch. Work 2 hdc into that final stitch, ch 1, then 2 hdc into the first stitch of the next section. Continue normally until the next boundary and repeat. Position the marker in the ch-1 space between the sections.
You have worked four hdc into two existing stitches at each boundary, so each boundary adds two hdc. Four boundaries add eight hdc per increase row. This explicit increase is essential: one hdc on either side of a marker would not increase the stitch total.
On the following plain row, hdc into each actual hdc, skip each ch-1 space, and restore the marker between the sections. A front gains one stitch per increase row, a sleeve gains two, and the back gains two.
Yoke row tracker
Begin every row below with ch 2 and turn.
| Row | Action | Hdc total |
|---|---|---|
| 3 | Increase at all four boundaries | 53 |
| 4 | Hdc across; skip the four ch-1 spaces | 53 |
| 5 | Increase at all four boundaries | 61 |
| 6 | Hdc across; skip the four ch-1 spaces | 61 |
| 7 | Increase at all four boundaries | 69 |
| 8 | Hdc across; skip the four ch-1 spaces | 69 |
| 9 | Increase at all four boundaries | 77 |
| 10 | Hdc across; skip the four ch-1 spaces | 77 |
| 11 | Increase at all four boundaries | 85 |
| 12 | Hdc across; skip the four ch-1 spaces | 85 |
| 13 | Increase at all four boundaries | 93 |
| 14 | Hdc across; skip the four ch-1 spaces | 93 |
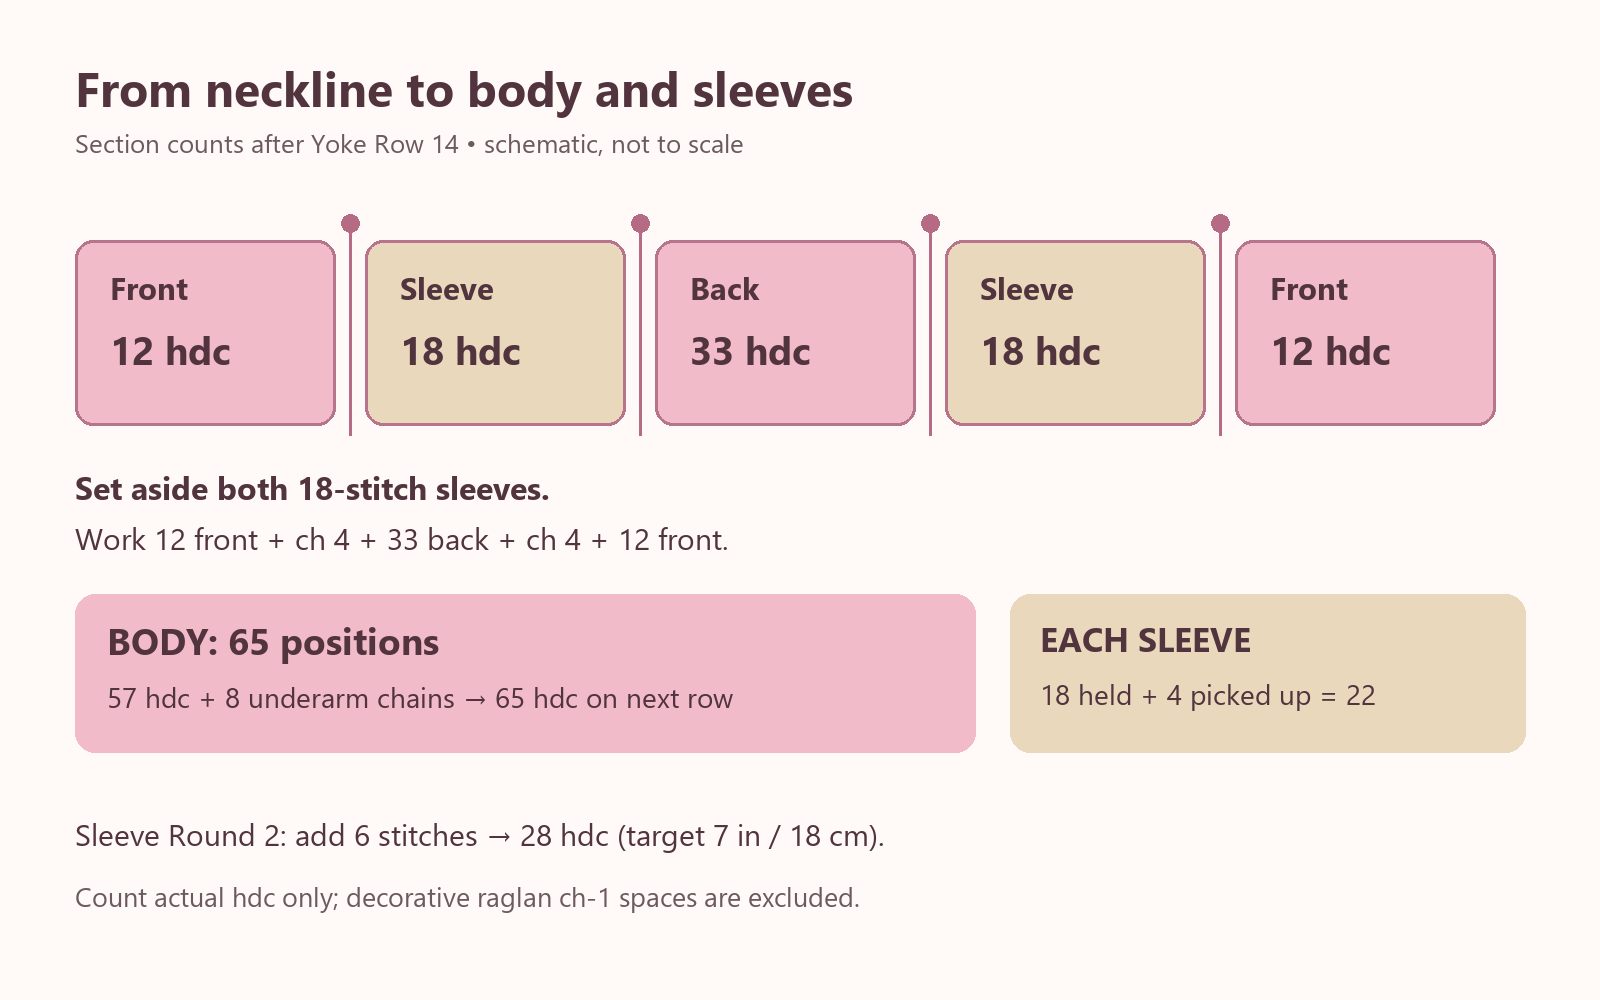
After Row 14, the sections contain 12 front, 18 sleeve, 33 back, 18 sleeve, and 12 front stitches. Count each section separately before continuing. Count only actual hdc stitches.
At the stated row gauge, 14 rows represent roughly 4⅔ inches of fabric height, not 3 inches. Check the yoke against the intended fit before separating the sleeves. If its depth is unsuitable, stop and revise the yoke with a sample; removing increase rows without recalculating the sections will change the chest and arm openings.
Part 2: separate the sleeves and work the body
Row 15 — RS: Ch 2 and turn. Hdc across the first 12 front stitches. Ch 4 for the first underarm bridge, leave the next 18 sleeve stitches unworked, and hdc across the 33 back stitches. Ch 4 for the second bridge, leave the next 18 sleeve stitches unworked, and hdc across the final 12 front stitches.
The four-chain bridges are widened from the source two-chain bridges to help achieve the original chest target with narrow front bands. There are now 57 hdc plus 8 underarm chains = 65 working positions. The sleeve stitches remain available around each opening; they are not fastened off or cut apart. Place removable markers at the first and last held stitches of each sleeve.
Row 16 — WS: Ch 2 and turn. Hdc across the row, including one hdc into each of the eight underarm chains. 65 hdc.
Following body rows: Ch 2, turn, and hdc into each stitch. Maintain 65 hdc per row.
Use length rather than a fixed ending row. Measure from the shoulder to the current lower edge, and stop when the remaining distance to 9.5 inches / 24 cm equals the measured depth of your hem ribbing. For example, if your ribbing is 1.25 inches deep, stop the body at approximately 8.25 inches from the shoulder.
Make a small ribbing sample before deciding where to stop. Six sc made with a smaller hook do not necessarily measure the same height as six hdc. At the reference row gauge, each additional hdc row changes the length by approximately one-third of an inch. Check the garment relaxed on a flat surface after the last row.
Part 3: add the ribbed hem
With Color A and the 3.5 mm hook, ch 7.
Ribbing Row 1: Sc into the second chain from the hook and into each remaining chain. 6 sc.
Ribbing Row 2: Ch 1, turn, and sc in BLO across all six stitches. 6 sc.
Repeat Row 2 until the strip’s row-end edge matches the full lower body edge without being stretched. Approximately 65 ribbing rows is an initial estimate; your ribbing row gauge determines the actual number needed. Mark the quarters of the strip and lower body edge to distribute the seam evenly.
Leave a sewing tail long enough for the seam. Sew one long row-end edge of the strip along the lower body edge. The six-stitch rows run perpendicular to the hem. Keep the seam flexible and check that neither piece gathers or ripples. Do not sew the strip’s ends together: the cardigan needs to remain open at the center front.
Part 4: crochet both sleeves
Work each sleeve with Color A and the 4.0 mm hook. Attach the yarn at the underarm. Mark the beginning of the round and keep the join in the underarm area.
Round 1: Ch 2. Work one hdc into each of the 18 held sleeve stitches and one hdc into each of the 4 underarm chains, using their free loops. Join to the first hdc. 22 hdc. If there is a small gap at a corner, close it later with a yarn tail rather than adding an uncounted stitch.
Round 2 — width adjustment: Ch 2. Work (2 hdc in the next stitch, hdc in the next two stitches) four times, then (2 hdc in the next stitch, hdc in the next four stitches) twice. Join. 28 hdc. This uses all 22 stitches and adds six evenly distributed stitches. At the stated stitch gauge, 28 stitches give the 7-inch upper-sleeve target. Check this circumference on the actual fabric; round gauge can differ from flat gauge.
Round 3: Ch 2, hdc around, and join. 28 hdc.
Round 4 — decrease: Ch 2, hdc2tog, hdc until two stitches remain, then hdc2tog. Join. 26 hdc.
Rounds 5–7: Ch 2, hdc around, and join each round. 26 hdc.
Round 8 — decrease: Repeat the Round 4 decrease method. 24 hdc.
Rounds 9–12: Ch 2, hdc around, and join each round. 24 hdc.
Round 13 — decrease: Repeat the same decrease method. 22 hdc.
Round 14: Ch 2, hdc around, and join. 22 hdc.
Check length before adding further rounds. Stop when the underarm-to-current-edge length plus the measured cuff depth equals 6 inches / 15 cm. Add or omit plain rounds as needed. If you need to stop before a scheduled decrease, finish on a plain round and use the actual opening circumference when making the cuff. Record what you did so the second sleeve matches.
The increase in Round 2 is a technical adjustment to the source sleeve. The source two-chain bridge and 20-stitch upper sleeve would measure about 5 inches at the listed stitch gauge, rather than the stated 7 inches. This adjustment preserves the finished-size target but changes the upper-sleeve shape; check the fit in your sample.
Ribbed cuffs
For each cuff, use the smaller hook and ch 7. Make six-sc ribbing exactly as for the hem. Continue until the row-end edge fits the sleeve opening comfortably. For the 22-stitch opening, about 22 ribbing rows is a starting estimate, not a requirement.
Join the two short, six-stitch ends to form a ring without twisting it. Sew one long row-end edge around the sleeve opening. Divide both edges into quarters first to spread the seam evenly. The cuff should sit comfortably rather than squeeze; do not stretch a short strip excessively to make it fit.
Part 5: front bands, buttonholes, and neckline
Plain button band
With the RS facing, join Color A at the lower edge of the wearer’s right front. Ch 1 and work 38 sc evenly from the hem to the neckline. This is an edge pickup count, so spread it across the entire edge rather than assuming every garment row supplies exactly one stitch.
Mark the quarter points first. Work approximately 9–10 sc in each quarter to reach 38 without crowding one area. If the edge ripples, the pickup spacing is too crowded; if it draws in, it is too sparse for your sc gauge. Change hook size or redistribute the pickup stitches before proceeding.
Rows 2 and 3: Ch 1, turn, and sc across. 38 sc. Keep the last loop secure while checking the band width; fasten off when the finished chest measurement is satisfactory.
Buttonhole band
Join Color A at the upper edge of the opposite front. Ch 1 and work 38 sc evenly down to the hem.
Row 2: Ch 1 and turn. Sc in the first 2 stitches. Work (ch 2, sk 2 stitches, sc in the next 6 stitches) four times. Ch 2, sk 2 stitches, then sc in the final 2 stitches. You have five buttonholes, 28 sc, and ten chain stitches across 38 positions.
Row 3: Ch 1, turn, and sc into every sc, working 2 sc into each ch-2 space. 38 sc. Test one hole with a 15 mm button before completing all the finishing. It should pass through with gentle pressure and stay closed when the fabric is relaxed.
The bands must provide enough coverage for the 17-inch / 43 cm closed chest, with the buttonhole band overlapping the plain band. Pin them closed and measure before sewing the buttons. Because sc row gauge and band overlap vary, three band rows may not supply the required width. If necessary, add the same number of plain sc rows to both bands, keeping the buttonholes in their existing row, and measure again. Confirm the neckline opening still looks balanced.
With the bands pinned in their final overlap, mark each button through its matching hole. Sew the five buttons to the plain band with secure stitches. The hole placement, rather than a separate spacing estimate, determines where each button belongs. Do not use a fixed 1.5-inch interval if it misaligns the closures.
Neckline edging
With the RS facing, join Color A at one end of the original foundation-chain neckline. Ch 1 and work 45 sc across the original neckline. Ch 1, turn, and sc across those 45 stitches once more. Fasten off.
The 45-stitch count covers the original neckline, not the new band tops. Neaten a band-top corner separately if needed, keeping any extra corner stitches outside this count. Check that the edging lies flat and does not tighten the opening.
Part 6: make the teddy bear
Use Color B and the 3.5 mm hook unless another color is specified. Work continuous sc rounds and count at the end of every round. An inc means two sc in one stitch. Choose a firm tension that hides the filling without making the hook difficult to insert.
The round counts below describe a small stuffed bear. Its finished dimensions depend on the teddy yarn and tension; no exact bear size is specified. Use modest filling so the applique is not unnecessarily bulky against the cardigan.
Head
| Round | Instructions | Count |
|---|---|---|
| 1 | 6 sc in a magic ring | 6 |
| 2 | Inc in every stitch | 12 |
| 3 | (Sc in next st, inc) six times | 18 |
| 4 | (Sc in next 2 sts, inc) six times | 24 |
| 5 | (Sc in next 3 sts, inc) six times | 30 |
| 6–9 | Sc in every stitch for each round | 30 |
| 10 | (Sc in next 3 sts, sc2tog) six times | 24 |
| 11 | (Sc in next 2 sts, sc2tog) six times | 18 |
| 12 | (Sc in next st, sc2tog) six times | 12 |
| 13 | Sc2tog six times | 6 |
Between Rounds 10 and 11, embroider the eyes around the level between Rounds 6 and 7, approximately five stitches apart. Position them symmetrically and secure the embroidery tails inside. After Round 11, add filling in small amounts, shaping the head evenly. Finish the remaining rounds, cut a long tail, thread it through the front loops of the six remaining stitches, and draw the opening closed. Conceal and secure the end.
Cream muzzle
With Color D, work 6 sc in a magic ring for Round 1. Round 2: inc in every stitch for 12 sc. Round 3: (sc in next st, inc) six times for 18 sc.
Fasten off with a sewing tail. Keep this piece flat and unstuffed. Pin it to the lower center of the head, then stitch around its edge. Embroider a compact dark-brown nose, a short vertical line below it, and a small mouth. Check the expression before fastening the embroidery tails permanently.
Two ears
With Color B, make each ear as follows: Round 1, 6 sc in a magic ring; Round 2, inc around for 12 sc; Round 3, (sc in next st, inc) six times for 18 sc.
Fasten off with a long tail. Flatten each piece and sew the lower edge securely to the upper side of the head. Pin both ears first to check their height and spacing. The pattern ears are caramel; the cream muzzle is the main contrasting facial piece.
Bear body
| Round | Instructions | Count |
|---|---|---|
| 1 | 6 sc in a magic ring | 6 |
| 2 | Inc around | 12 |
| 3 | (Sc in next st, inc) six times | 18 |
| 4 | (Sc in next 2 sts, inc) six times | 24 |
| 5–8 | Sc around for each round | 24 |
| 9 | (Sc in next 2 sts, sc2tog) six times | 18 |
| 10 | (Sc in next st, sc2tog) six times | 12 |
| 11 | Sc2tog six times | 6 |
Add filling after Round 10, then work Round 11 and close the remaining stitches as for the head. Leave a tail for assembly. Sew the head firmly to the body, keeping the muzzle facing forward.
Two arms
For each arm, work Round 1: 6 sc in a magic ring. Round 2: inc around for 12 sc. Rounds 3–6: sc around, maintaining 12 sc. Round 7: (sc in next st, sc2tog) four times, giving 8 sc.
Add a small amount of filling. Round 8: sc2tog four times for 4 sc. Close the opening and leave a sewing tail. Pin the arms to the sides of the body, around the level of Body Round 2, angling the paws toward the front so they can hold the heart. Stitch securely after checking both sides together.
Two legs
For each leg, work Round 1: 6 sc in a magic ring. Round 2: inc around for 12 sc. Rounds 3–7: sc around, maintaining 12 sc. Round 8: (sc in next st, sc2tog) four times, giving 8 sc.
Add light filling. Round 9: sc2tog four times for 4 sc. Close and leave a sewing tail. Sew the legs to the lower sides of the body to give the bear a seated shape. Avoid a hard, overfilled foot that would make the applique uncomfortable.
Small pink heart
The heart uses a clarified one-round construction because an empty magic ring has no existing stitches to work into.
With Color C, make a magic ring. Work the following directly into the ring: ch 2, 3 dc, 3 hdc, ch 1, 1 dc, ch 1, 3 hdc, 3 dc, ch 2, sl st into the ring.
Pull the ring closed gradually, arranging the two groups of dc into the rounded lobes and the center dc into the lower point. Fasten off with a sewing tail. This version contains 13 worked stitches, two framing ch-2 lengths, two ch-1 spaces, and the final joining slip stitch. It does not need a second round.
Sew the heart to both paws and add a small securing stitch to the bear’s chest. It should sit in front of the body without dangling on a single attachment thread.
Attach the assembled bear
Before sewing to the cardigan, check the muzzle, ears, neck seam, limbs, and heart. Pull gently on each attachment and secure any loose point. Conceal the assembly tails inside the bear.
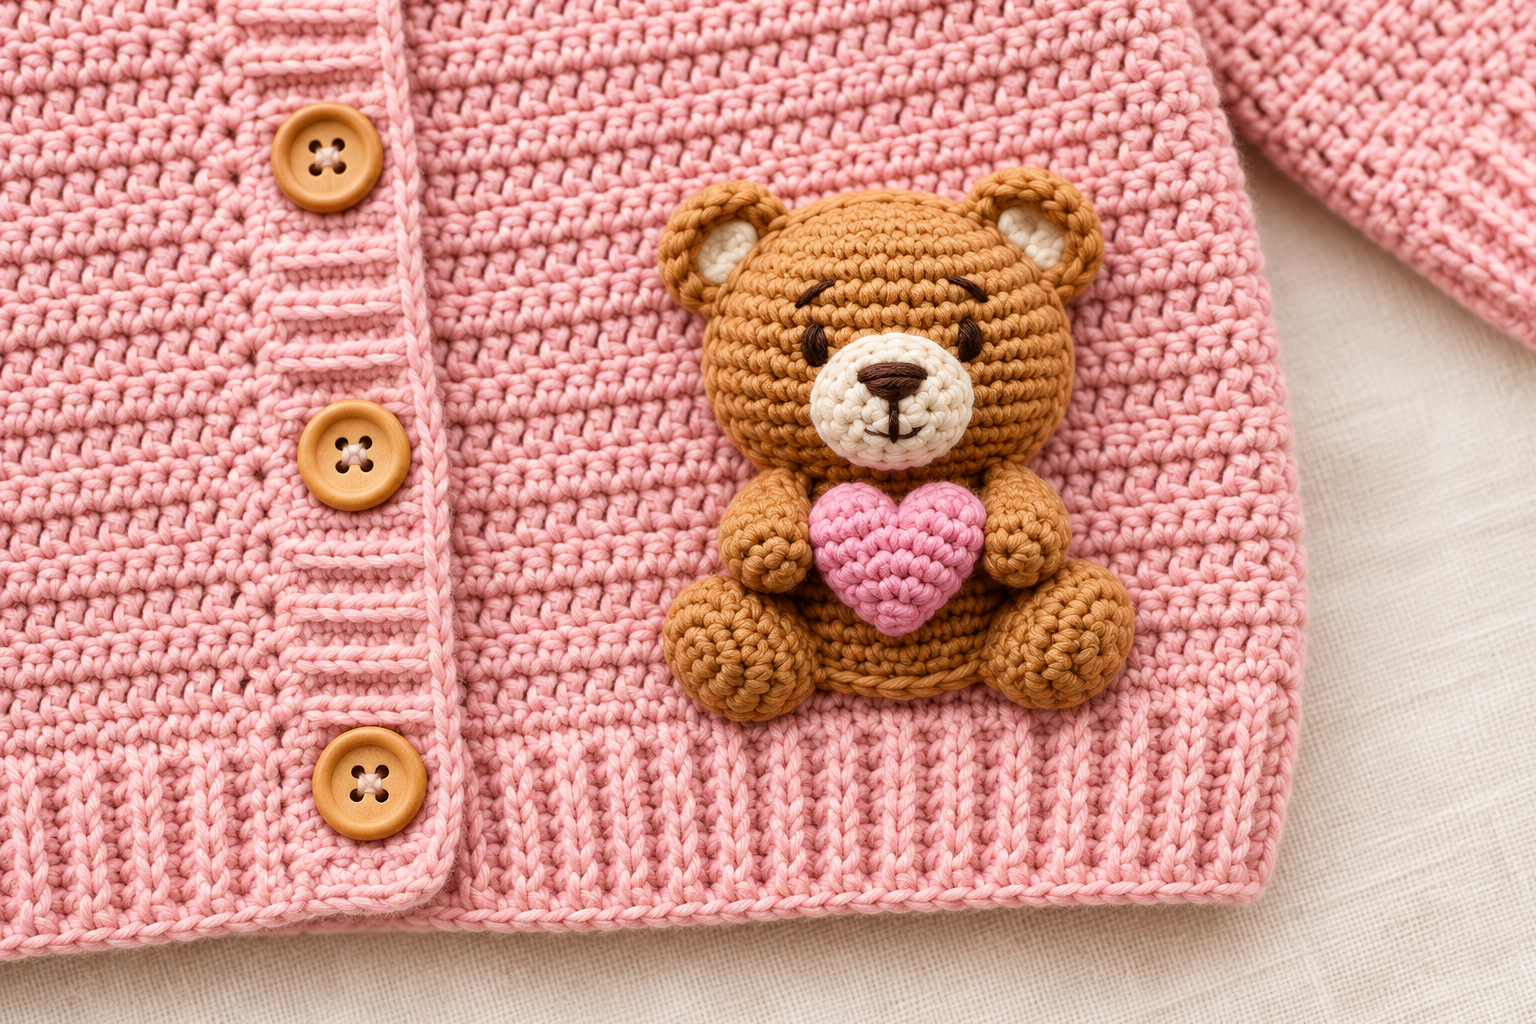
Lay the cardigan flat with its bands arranged as they will be when buttoned. Pin the bear to the wearer’s left front, on the viewer’s right, to match the supplied pink thumbnail. Position its lower edge approximately 1 inch / 2.5 cm above the hem ribbing and keep it clear of the button band.
Sew through the back of the head, body, and limbs into the cardigan with several secure attachment areas. Spread the sewing across enough stitches to support the bear without puckering the panel. Keep the cardigan fabric relaxed while sewing and secure the tails on the inside. The bear should move with the fabric rather than hang from one central point.
Finishing and care
Weave in every garment tail securely, including those at the sleeve joins and magic rings. Close any underarm pinholes with a few small stitches. Recheck the button attachments and ensure no filling is visible through the teddy fabric.
Wash or gently block according to the yarn manufacturer’s instructions. Dry in the shape recommended for that fiber, supporting the teddy so it does not pull the front panel out of shape. Do not assume all acrylics or all wooden buttons can tolerate tumble drying.
Once dry, measure the closed chest, total length, and both sleeves again. Check that the buttonholes align, the two cuffs match, and the hem sits evenly. Store the cardigan clean and dry, and inspect the decorative attachments before it is worn again.
Troubleshooting and common questions
Why is my yoke stitch count wrong?
An increase row must add eight actual hdc. If your count has not changed, you probably worked one hdc on each side of a boundary instead of two in each boundary stitch. If you have extra stitches, check whether you worked into the decorative ch-1 spaces on a plain row. Count the five sections separately to locate the mistake before continuing.
Why do my hem or cuffs ripple?
The ribbing strip and garment edge are different fabrics with different row gauges. A strip that is too long can flare; a strip that is too short can gather the edge. Pin or baste before sewing permanently, and adjust the ribbing row count until both edges fit in a relaxed state.
Can I make the cardigan without the teddy?
Yes. Complete the cardigan and finishing steps, then omit the bear and heart. The garment size does not depend on the applique. You can also use the same caramel and cream palette for a separately designed flat decoration, but that is not the stuffed bear pattern given here.
Can I change the size by changing the hook?
Changing the hook changes both stitch size and fabric feel, and does not reliably grade the neckline, chest, and sleeves together. This guide provides only the 3–6 month size. For another size, use a properly graded pattern or recalculate all the construction measurements and test a sample.
Does the illustrated sweater show the exact result?
No. The supplied thumbnail and new AI-generated images establish the blush-pink color scheme, five-button styling, and teddy-with-heart theme. Generated stitch textures, ribbing proportions, and bear details can differ from the written construction. Use the stitch tables and measured checkpoints when crocheting, and replace styling images with photographs of your tested sample when available.
What should I record while making a sample?
Note the yarn, hook, washed gauge, actual yoke depth, body ending row, sleeve ending round, ribbing row counts, band width, and finished measurements. These notes will make the second sleeve easier to match and allow you to assess the revised fit before sharing the pattern as tested.
The blush-pink fabric provides a gentle backdrop for the little caramel bear, and the wooden buttons add a warm finishing detail. Take time over the gauge and attachment steps, then check the cardigan against its finished measurements before wrapping it as a gift.